Reading Time: 7 minutes
Last week we brandished a big knife. This week we play with fire.
We are going to cover the three cooking techniques you must know to feed yourself with any regularity: boil, saute, and roast. Each comes with its own implement of doom — pot, pan, and earthenware, respectively. We are going to use all of them in this lesson.
But before we get into dancing around the flames, a quick safety message from your local fire marshal.
Safety First
Kitchen fires are the number-one source of home fires. So it’s important you own a dry-chemical fire extinguisher. Never ever spray a water fire-extinguisher onto a grease fire. Your home will be an inferno before you take your finger off the trigger.
Always keep the area around your stove and your cookware free of grease build-up.
And don’t forget to (literally) save your skin. Use silicone oven mitts and potholders rather than cloth. (They can even be fun like ones pictured below!) Silicone withstands greater heat and can get wet without getting hot when touching hot objects. If you get a cloth mitt or dishrag wet and pick up a hot item, the moisture in the cloth will instantly steam and burn your hand.

Now with our safety message behind us, lets get some heat on the subject. Here are the three essential cooking methods that will enable you to cook just about anything you can get your hands on.
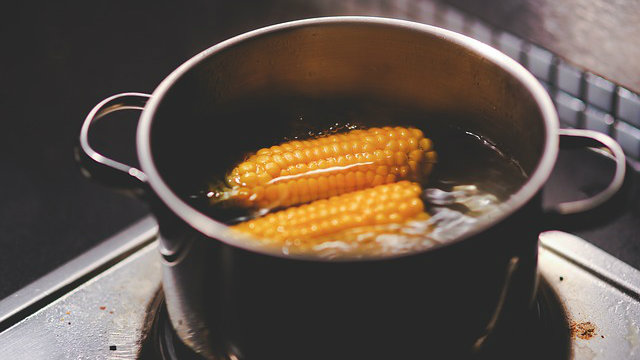
Cooking Method 1: Boil
Put water in a pot and turn the heat up to high. When the water is boiling with big bubbles drop your ingredients in and wait for them to cook through to your liking.
Safety tip: To test if done, extract ingredients from the boiling water with tongs or a slotted spoon. If you check your ingredient in the pot you risk burning your arm from the steam rising up.
Why Boil?
In contrast to sauteing and roasting, boiling does not alter the flavor of the ingredient. There is no risk of the flames burning the food, and you don’t need any oils or other seasonings.
What to Boil?
Boil ingredients that you want to season after cooking them. Firm and soft vegetables are prime candidates.
Cooking Method 2: Saute
Put your ingredients in a pan and cook them on the stove-top. We did this in week two with our stir-fry drill.
The higher the heat, the faster the outside of the ingredient will cook. This is the most important thing to note about how high you want those flames.
A general rule of thumb is this: the thicker the cut, the lower the heat. Why? Thicker cuts take longer to cook through to the center, so you don’t want the heat so high that the outside burns before the center cooks.
Some people like a char on the outside, some people like only the slightest browning. Some people like their ingredients soft in the middle, some like them more crunchy. You may have a different preference for every ingredient. It’s up to you and that’s the whole fun of working the stove-top.

Why Saute?
Cooking ingredients in the pan allows you to see what’s happening. You can adjust the heat quickly by stirring, flipping, adding additional ingredients, or rising or lowering the flames. And you can taste and add seasonings easily.
What to Saute?
Anything. Meats, firm veggies, soft veggies and even leafy greens are all great items to saute. The more you do it the better you will get.

Cooking Method 3: Roast
Put ingredients in an oven-safe container and stick them in a 400-degree oven until they are done.
Why Roast?
To get them out of your face. Like boiling, roasting is an easy way to go. Stick ’em in, set a timer, check when it goes off.
Roasting applies a consistent overall temperature to your ingredients. This is in contrast to sauteing which applies variables temperatures throughout the cooking process. When you are new to cooking, roasting is the more forgiving approach.
What to Roast?
Firm and soft vegetables and meats or thick cuts of meat are great candidates for roasting. Leafy greens and thinly sliced cuts of meat? Not so much because they dry out.
Skill Drill: Make a Fancy Salad and Dressing
A salad is a “fancy salad” in my book when it involves cooked ingredients. One reason we are making a salad is that we are boiling vegetables, which require seasoning after cooking. So why not toss everything with a dressing?

Ingredients:
- 1/2 serving firm vegetable — carrots, cauliflower, yams, etc.
- 1/2 serving soft vegetables — tomato, mushrooms, peppers, etc.
- 1 serving leafy green — lettuce, kale, spinach, etc.
- 1 serving meat or meat substitute
Pop quiz: If one serving is a handful, what is half a serving? Half a handful! Revisit lesson one for guidance on serving sizes
Seasonings:
- Salt
- Pepper
- Fat of choice — olive oil, butter, coconut oil, ghee, etc.
- 1 thing sour — lemon, lime, balsamic vinegar, rice vinegar, etc.
- 1 thing spicy — garlic, onion, cayenne, chili, ginger, etc.
- 1 thing savory — dried or fresh oregano, basil, thyme, rosemary, etc.
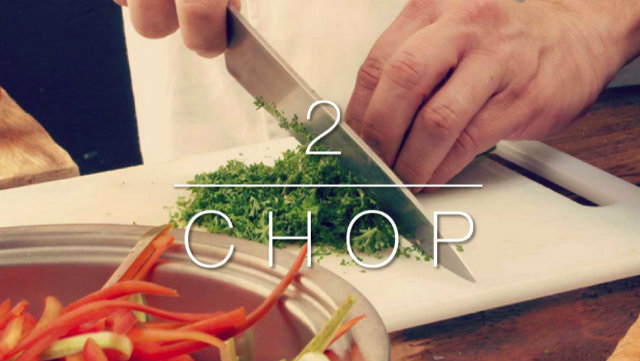
Chop:
- Portion out a 1/2 serving of firm veggies without chopping further.
- Chop up a 1/2 serving of soft veggies.
- Portion out 1 serving of meat or meat substitute without chopping further. Remember to use your non-porous cutting board for meat.
Mince:
- 1 serving of leafy greens

Sprinkle:
- Season your chopped soft veggies
- Season your un-chopped portion of meat or meat substitute. Revisit week one for guidance on seasoning.
- Create a simple vinaigrette or citrus dressing for your salad by vigorously whisking the following together with a fork: 3 parts oil to 1 part sour (vinegar or citrus juice) + salt + pepper.

Poke:
- Saute your soft veggies.
- Boil your firm veggie. Extra credit: Blanch your veggies by taking them out of the boiling water and running under cold water to stop them cooking immediately. This keeps their color nice and bright.
- Roast your meat. Extra credit: Start in the pan and finish in the oven. That means you sear the meat or meat substitute on either side in a pan for a minute or two on high until it gets some color and then put the meat in the oven to finish.
- Chop your firm veggie after you finish boiling it. Chopping before would force you to fish out a bunch of little pieces from the boiling water.
- Chop your meat portion after you finish roasting it. Chopping before would risk drying out the thinly sliced pieces.

Throw all the ingredients in a bowl, add the dressing, stir with a fork, and enjoy. Post a photo and tell us how it went! Then, play with fire a few more times this week. Practice your three essential cooking methods and make your own version of a fancy salad each time.
Ready for more? Dive into the rest of the lessons in this series:
- The 5 Moves to Cooking Everything: Home Cooking Boot Camp Lesson 1
- Knife Skills and Stir Fry: Home Cooking Boot Camp Lesson 2
- How to Make Multiple Meals at Once: Home Cooking Boot Camp Lesson 4
- How to Organize Your Kitchen for Speed: Home Cooking Boot Camp Lesson 5
- The Power of Flavor Profiles: Home Cooking Boot Camp Lesson 6
- The Secret Tool of Taste Balancing: Home Cooking Boot Camp Lesson 7
- Learn to Play the 3 Flavor Notes: Home Cooking Boot Camp Lesson 8


If you interested in making healthy, delicious, home-cooked meals in a practical and consistent way, Casey is offering a free five-day email course called Jumpstart Your Healthy No-Recipe Meal Prep Practice.