 Reading Time: 6 minutes
Want to train your cardiovascular system while toning your backside? Or find a repetitive endurance exercise that does not take a toll on your joints? Or engage in a heart-rate raising sprint without tightening your hip flexors?
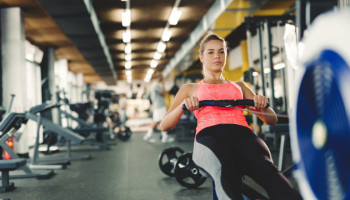
Indoor rowing has taken off in popularity over the last ten years, popping up in HIIT training and CrossFit workouts. Indoor rowers are also one of the least expensive pieces of cardio equipment you can purchase to add to your home gym.
But what if you’re daunted by hopping on the rower for the first time? Or worried about lower back pain from incorrect rower use? Whether you’re a newbie or looking to refine your technique, practicing the fundamentals is the best way to avoid injury and build skill when it comes to any high-repetition movement.
This article will answer all your questions about rowing basics and put the entire indoor rowing motion together into a safe, effective practice.
How to Properly Setup Your Rower
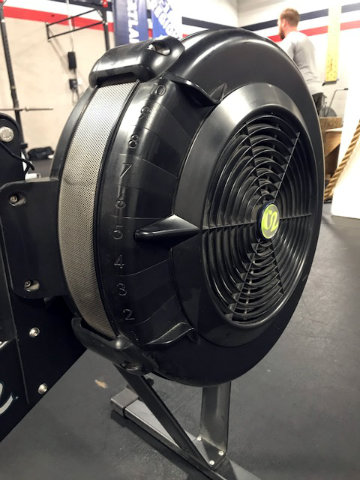
Step 1: Set the Damper
Before you even sit on the rower, set the damper to “5.” This setting is considered similar to rowing on actual water. Lower damper settings let less air into the rower’s flywheel, while higher damper settings let in more air. Therefore, higher damper settings create more “drag” and will be more taxing on your cardiovascular systems.
That said, raising the damper setting is a variable to toy with later down the line and a higher damper setting doesn’t necessarily correlate to “harder” or “heavier.” For the most part, and for most athletes, the best approach is to just stick with “5.”
Step 2: Adjust the Footholds
Despite initial appearances, rowing is a leg-driven exercise. The positioning of your feet can determine how smoothly you move through the rowing motion. The correct foothold setting is dictated by your height, shin length, and ankle mobility.
Start with the middle setting, typically number “3,” and then also pull the foot straps snug. Adjust and experiment until you find your comfort. Generally, taller individuals will be between settings “3” and “5.”
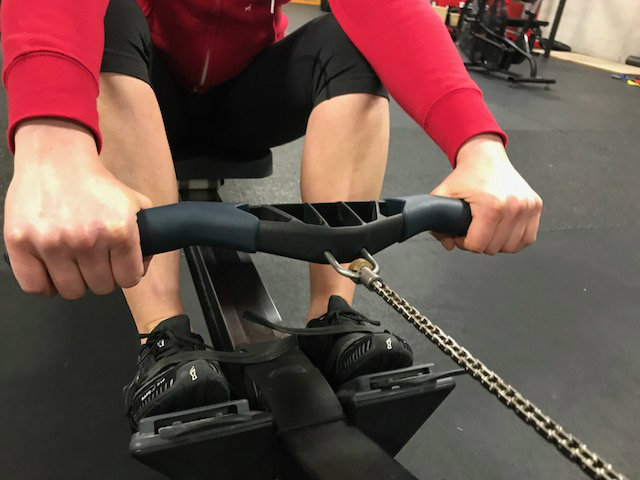
Step 3: Use the Proper Grip
The proper grip on a rower is overhand with a flat wrist. For maximal upper-body engagement, wrap your thumb around the handle. If you observe your knuckles turning white while rowing, loosen up your grip or try releasing your thumb (and letting it just hang underneath the handle).
Understanding the Display
A great way to familiarize yourself with the rower and its display is to:
- Select “Just Row”
- Row 500m
- See how long it took you
In general, a good goal for new rowers is to row 500m in less than two minutes. If it takes a lot longer for you to row 500m, now you have a first goal. Improving your technique may be all you need to get there, so let’s discuss what that looks like.
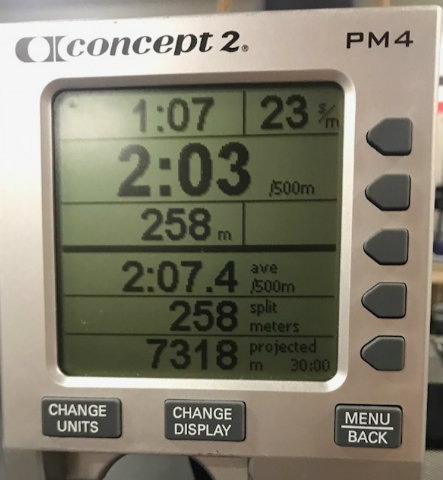
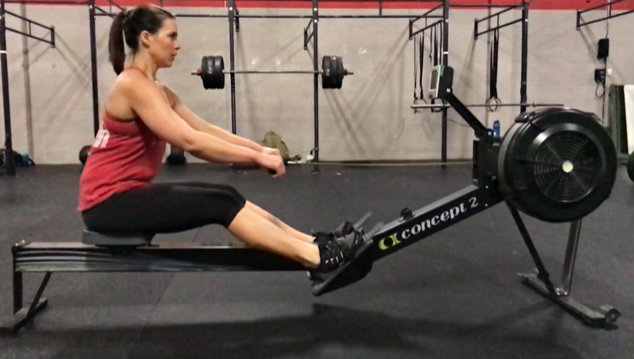
Note: in the upper right-hand corner of this photo you’ll see “23 s/m.” This means 23 strokes per minute. Basically, that is how many times you move backward and forward each minute. A higher stroke rate can mean a faster speed, but there isn’t necessarily a direct correlation. For beginners, aim for 22-26 strokes per minute.
What You Need to Know About Indoor Rowing Technique
Rowing can be broken down into four phases: catch, drive, finish, and recovery.
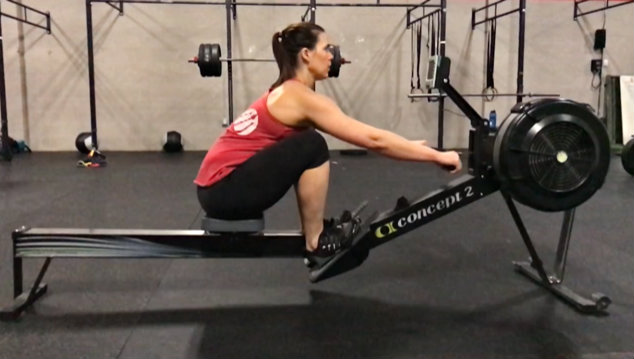
1. Catch
Using an overhand grip with flat wrists, hold the rower handle forward of your knees with arms fully extended. Shins start in a vertical position. Upper body is in a one-o’clock position, leaning slightly forward. Gaze is straight forward over the horizon.
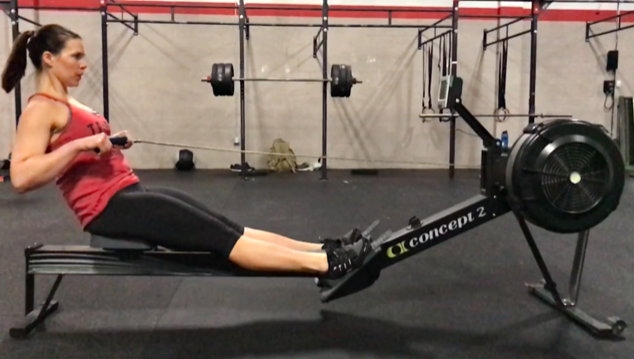
2. Drive
Pushing off the four corners of your feet, straighten the legs, as the cable drives backward in a straight line. The handle should pass the knees, with the legs finishing the movement in full extension.
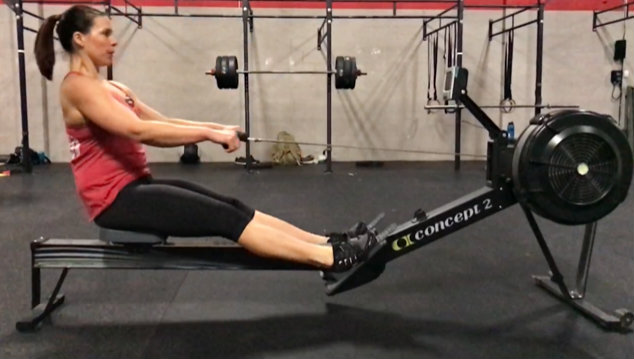
3. Finish
Finish with shins horizontal and upper body in an eleven-o’clock position, leaning slightly backward. The handle touches the lowest rib, with the chain maintaining a straight horizontal position. Avoid “chicken winging” the elbows. Elbows should be tucked straight back. Gaze remains straight ahead.
4. Recovery
Allow the upper body to return to the one-o’clock position. Once the handle passes forward of the knees, the knees bend and return to the catch position with shins vertical. Unless you’re sprinting, recovery on the rower is generally two to three times as slow as the drive.
Now, Put It All Together
“Smooth” is “fast” in indoor rowing. So, work to develop a continuous stroke. In starting from the catch position, think: “legs, arms, arms, legs.” This means, as the heels dig in in and the body drives away from the flywheel, legs drive first and then arms follow. Then, in the recovery toward the flywheel, arms come forward first and legs follow.
Watch this video for a slow-motion demonstration of proper rowing technique:
Sample Workouts for You to Try:
Base Builders:
- Row for 10 mins, maintaining a 22-26 s/m stroke rate. Record your distance.
- Row 1000m aiming for a consistent 500m pace. Record your time.
- Row 50 calories aiming for a consistent 500m pace. Record your time.
Sprint Intervals
- Row 250m in as close to 1 minute as you can. Rest 1 minute. Repeat 5-10 times.
- Row 500m in as close to 2 minutes as you can. Rest 90 seconds. Repeat 3-4 times.
Descending HIIT Ladder
- Perform 10 squats, 10 push-ups, and row 10 calories. On the second round, cut down to 9 reps/calories of each exercise. Keep descending in reps until you get to 1.
Buddy Row
- Grab a friend and take turns rowing 500m until you get to 5000m. Try to finish in 25 mins or less.
For beginners and veterans alike, revisiting the basics is the key to both rowing performance and injury prevention. Work to smooth out your technique by practicing your indoor rowing a few times a week. The longer you row, the further you’ll go.

A believer in constant movement, Liz has partnered with clients of all types to achieve various end goals. You can catch her teaching yoga at Ballston CrossFit in Arlington, Virginia.