This exercise — known as “static wall” — can help reduce tension and pain in the upper back, neck, and shoulders. Often pain and tension in these areas can be attributed to poor posture where the upper back rounds forward and the muscles of the hips and legs become tight from sitting.
This exercise works by allowing your upper back to straighten out against the flat surface of the floor while stretching and strengthening muscles of the hips and legs.
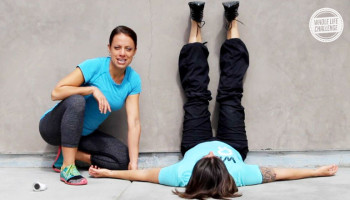
How to Do Static Wall
- Start by getting on the floor with your hips as close as possible to a wall.
- Place your back on the floor and bring your legs up the wall with your butt as close to the wall as possible.
- Lie on your back with your legs pointed straight up and against the wall, upper body relaxed with arms out to your sides at about 45 degrees and palms facing up.
- Your feet should be hip-width apart, which is about one and a half fist widths apart.
- In this position tighten your thighs and pull all of your toes down and back evenly toward your face. Your feet must be pointed straight (parallel) for your hips to properly do the work to stabilize your spine. Hold for four minutes. Be sure to keep your toes pulled back and thighs tight.
- Try to even out the height of your heels, which will place both hips even against the floor. Your upper body must remain totally relaxed. Let your legs do the work.
How to Modify Static Wall: If your hips are lifting off the floor, then scoot your butt back until you are able to place your hips flat on the floor. Eventually your hips will sit closer to the wall and be flat on the floor at the same time.
How to Maximize the Benefits of Static Wall
Get your feet into the correct position to maximize the benefit you get from this exercise:
- Get into position on the floor with your legs up the wall.
- Spread your heels one and a half fist widths apart (any wider than this will be wider than hip-width and thus too wide).
- Pull your feet back, and pull down from the pinky side of your foot. Yup, keep that outer edge of your foot pulled back.
- Then, internally rotate your legs until your feet point straight back from the wall.
Simply getting into the proper foot/ankle position for static wall can be a herculean effort for many, especially if you are accustomed to wearing pointed dress shoes or high heels, but taking the time to nail this position will make or break this exercise.
It is better to perform static wall with the correct positioning for a shorter period of time, than to do it incorrectly for a longer period of time. Start by holding it correctly at first for one minute then work up to holding for four minutes.
Try this exercise daily for the best results. Enjoy!

Maryann, who is currently certified as a Posture Alignment Specialist, created Realign as a way to empower others to take responsibility for their own health the same way she did. Maryann works with people one-on-one both digitally and in-person at her studio in San Diego, California.
To learn more about Maryann's programs, visit Realign Therapy. Maryann is also the founder of The Posture Workout a revolutionary online form of Posture Alignment Therapy that makes this method easily accessible for everyone.