This stretch — called the hip crossover stretch — targets the muscles of the outer hip and low back. If you experience chronic tension or pain in these areas, the hip crossover stretch can be a great way to restore mobility and function to the hips and low back.
Keep in mind the benefits of hip crossover stretch come from getting into the correct position and breathing as you do the stretch. Even though we are calling this a “stretch,” we are actually doing much more than just stretching tight muscles. We are, in fact, re-positioning the shoulders, hips, knees, and ankles.
Therefore, when you do this exercise, everything from the position of your hands to the position of your feet matters. To ensure your success, follow these instructions carefully and step by step.
When to do this stretch:
- If you are already stretching, you can simply add this one to your regular routine.
- If you are not already stretching, now is a great time to start!
- You can do this daily or you can even get down on the floor and do this after extended periods of sitting for a quick and easy way to work out the kinks.
How to Do the Hip Crossover Stretch
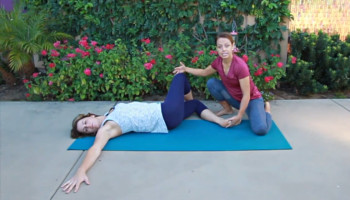
- Lie on your back with your knees bent at 45 degrees and your feet on the floor. Have your feet and knees hip-width distance apart, and keep your feet straight.
- Place your arms straight out to your sides at shoulder level (90 degrees), with palms flat on the floor.
- Cross your right ankle over the left knee, and place your right ankle bone (that little part that sticks out) just above your left knee.
- Take a deep breath in and slowly rotate your ankle/knee junction to the left, down to the floor, without letting the left foot slide across the floor. Preventing the foot from sliding across the floor is one of the keys to this stretch.
- Your right foot should now be flat on the floor, along with the outside of your left leg.
- Turn your head to the right (the opposite direction of your legs) and relax your neck and shoulders.
- Press the right knee away from your body using the right hip muscles (don’t use your hands for this step).
- Flatten the palms of your hands and fingers to the floor.
- Breathe deeply through your belly, lower back, and sides, keeping your shoulders relaxed.
- Hold this position for 1 minute, then keep your legs crossed as you slowly rotate back to the starting position.
- Switch sides and repeat.
Tip: alternate which side you start with to keep your body balanced over time.
Mistakes to Avoid:
- Don’t allow the foot on the floor to slide toward the middle of your body (across the floor) when you rotate the ankle/knee junction down toward the floor.
- Make sure the bottom of the foot that is resting on the opposite knee is totally flattened to the floor.
- When switching sides, make sure to reset the feet and knees to hip width distance apart.
- Don’t hold your breath.

Maryann, who is currently certified as a Posture Alignment Specialist, created Realign as a way to empower others to take responsibility for their own health the same way she did. Maryann works with people one-on-one both digitally and in-person at her studio in San Diego, California.
To learn more about Maryann's programs, visit Realign Therapy. Maryann is also the founder of The Posture Workout a revolutionary online form of Posture Alignment Therapy that makes this method easily accessible for everyone.