 Reading Time: 9 minutes
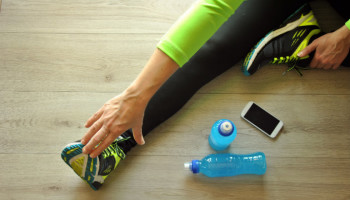
Have you ever decided to start a mobility or movement program, only to come to a frustrating halt when told to avoid any “burning, nervy pain” in the area you want to free up and mobilize? Because every time you drive your hip forward, it’s like you plugged in a miniature Christmas tree or maybe there is an odd tingling going through your palm into a couple of your fingers.
You’ve asked your trainer or yoga instructor what they think is causing these sensations and they suggested it might be a nerve, but had little to offer as far as what to do beyond seeing a physical therapist, lifting less, or going slower.
These are reasonable answers, and the kind of individual modifications a trainer should use as a first measure, but what if the real solution lies in learning how to mobilize that nerve?
What if the problem isn’t that you have tight hamstrings or shoulders, but a restricted nerve those muscles are trying to protect by staying tight? And what if the solution isn’t stretching and grinding on tissue that already feels threatened, but gently reintroducing movement to that nerve so that it, in turn, allows you to stretch farther, get stronger, and feel looser?
Read on for an explanation of the science behind this, and watch the video for a demonstration.
2 Things to Know About Your Nervous System
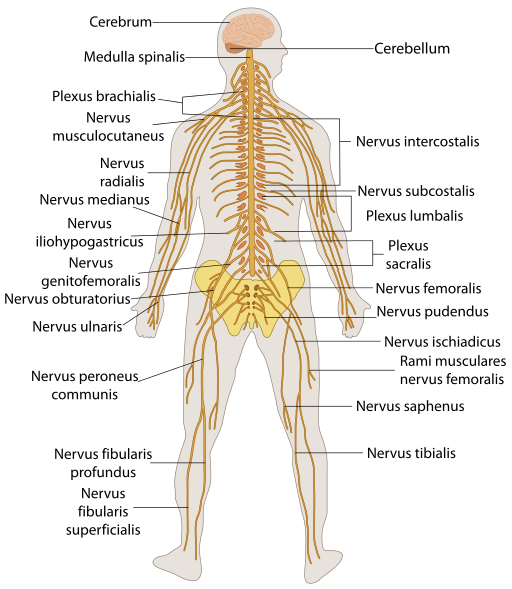
There are a couple considerations to keep in mind when we choose to mobilize nervous tissue. One is that nervous tissue is part of the master control system — all signals in the body travel via the nervous system. Motor control and sensory information are all conveyed via nerve conduction and loss of signal is a massive threat to survival.
 Because of that, the nervous system conservatively biases towards survival rather than performance, doing everything it can to ensure that nervous tissue is not damaged. This can result in less flexibility, reduced strength, increased pain, or anything that will protect that tissue from the possibility of injury.
The second consideration has to do with the healing rate and recovery outcomes of nervous tissue relative to other tissues in the body. Speaking in general terms, a wound on the skin can take days to weeks to heal, injuries to vessels or muscles take weeks to months, and broken bones and connective tissues need months to a year or longer for full recovery.
But severe nerve injuries may never heal and if they do, they regrow very slowly, as little as half a millimeter per day.
All of this means our nervous system will be very cautious in exposing its tissue to risk of injury, and will create an output that makes an area feel tight, weak, unstable, or achy. In addition, nervous tissue doesn’t like to stretch, at least not in the same way we think of stretching for muscles, fascia, and connective tissue, but it does need freedom of movement and some mechanical tension.
Think of it this way: ropes can stretch and bands can stretch, but wires take load. Try to stretch a wire and it might snap — but you can unkink it instead.
Nerve Glides: What They Are and How They Work
A nerve glide is a technique for tensioning and carefully moving a nerve within its tunnel or sheath. Because you feel the nerve tensioning, it’s easy to think of this as a stretch, but what you’re really doing is sending a status update to your nervous system about the safety of its tissues. If you can adequately demonstrate to your brain that a movement, contraction, or rate of speed isn’t going to cause injury, it will take the parking brakes off of a limiting restriction that it has imposed.
Let’s take a look at one nerve glide as an example. Think of the classic hip flexor stretch “the couch stretch.” This stretch is typically described as targeting one of your major hip flexors, the rectus femoris. The idea is that we all sit too much and our hip muscles and surrounding tissues have become chronically “shortened” and gummed up. As a result, they’re preventing full hip extension and pulling your back out of alignment, thus interfering with your ability to jump high, run fast, lift heavy, or otherwise just feel good.
The commonly suggested remedy is to stretch the hip flexors, effectively taking the parking breaks off your buns and allowing you to become a heavy snatching, box jumping, warrior-three posing machine. This is all good, reasonable advice that has been effective for many people, but what if something is missing from the basic premise?
What if your how far you can stretch improves not because you stretched a tight muscle, but because you inadvertently freed up an entrapped nerve? What if the problem isn’t even there, but further up or down the nerve trunk in your foot or mid-back?
Note: Anyone with a preexisting injury or condition that affects the nervous system should consult with a doctor first before attempting to use this drill. A surprising number of people that ask me to examine nagging injuries have never talked to their doctor or consulted an orthopedist, even when they have splendid health care coverage. Talk to your doctor — information is options.
How to Practice a Nerve Glide
Try this:
- Do a quick check of your range/ease of motion in an air squat, toe touch, hip bridge, or wherever you have felt some tightness, weakness, or discomfort. Make a mental note of how this felt.
- Stand in front of a footstool, couch, easy chair, or something a bit higher than your knee, but lower than your hip. Those of you who are pretty tight will want something closer to your knee height. Those who are more flexible may want something higher.
- Take off your shoes and pad the surface of the chair with a towel so you don’t experience any discomfort across the top surface of your foot. You want to experience no pain as you perform this drill so your brain doesn’t get more “practice” feeling pain or tightness in this position.
- Grab a broomstick, dowel, or PVC pipe to use like a walking staff for balance. It’s also important your brain doesn’t associate a fear of falling with this drill. Anything that threatens the local tissues, joints, or your skull can make a drill ineffective. Having good, comfortable balance is key to success with nerve glides.
- Place the top of your foot on the edge of the stool or chair behind you, with your hip, knee, ankle, and foot aligned and neutral. Your hip on your target side should be back in slight extension while keeping your pelvis neutral, which for many of you means tucking your tailbone forward. Some of you will begin to feel a pull on the front of your thigh as you tuck, so you might get something lower for your foot if this describes you at this point.
- While holding on to the stick with your hand on your target side, descend on your platform leg into a gentle quarter squat. The goal isn’t to do a one-legged squat. We are incrementally and segmentally adding a tensioning sequence to your femoral nerve, which just so happens to innervate your quads, one of which is your rectus femoris. By “incrementally,” I mean we are progressing our stretch and ROM a quarter inch at a time, not pushing for big gains but accumulating progress. By “segmentally,” I mean we are exploring and establishing which part of your body has the restriction. A nerve can be a long thing, crossing more than one joint, and it’s also a branch of the longer trunk of your spinal cord, so what feels like restriction in your hip may be higher in the spine or lower in the knee or foot. As you spend time in this position, some of you will feel a very specific stretch as a thin line down the front of your thigh. Others of you will feel it higher in the hip crease or lower toward the knee.
As we progress this sequence, we want to keep two requirements in mind: always hit the targeted area for our mobility drill and never move into pain. We are trying to create novel, specific information about a given area so the brain can map it better, so none of that information should be about pain or intense discomfort. Your brain is probably already more than good enough at mapping pain, so let’s create some fresh input.
At this point, you can try adding a little spinal flexion by doing a relaxed standing “crunch.”
- Let your head fall forward, your shoulders relaxed and hanging, caving your chest in and rounding your upper back while keeping your lower back flat. Don’t muscle this final segment. Try to stay aligned but as relaxed as possible throughout, breathing naturally.
- Flex and extend your upper back a few times, no more than three to five times. Think of doing a standing “cat-cow” from yoga or alternating standing as tall as you can to lengthen your spine with trying to look into your belly button, causing your upper back to round.
Adding this final segment puts your femoral nerve under full tension, but you may need to take a few weeks to a few months to get here. That will largely depend on your previous fitness and injury history, as well as your current relative mobility, aka how bendy you are.
You might also try flexing your spine only halfway and then tucking and untucking your pelvis here a couple of times. Some may feel a specific flossing or tensioning sensation here — it will feel as if you are taking one long strand of muscle fiber and pulling it back and forth. You may also be able to feel it ever so slightly gliding in a little “tunnel.” Please hear me when I caution you to keep this light and gentle.
Note: On a one-to-ten scale of perceived exertion, please do not go beyond a three while doing this drill. While it can be fascinating to stretch something in your body that you have never felt before, you do not want to overstretch. That means you need to be alert for tightness, tingling, numbness, burning, or pain.
If you feel any of those things, go back a few steps in this drill. Go back to the beginning before the quarter squat and try the pelvic tucking there or the flexing/extending of your upper back. You could also try holding one or all of those positions statically and then going down and up in your quarter squat. All of this depends on which segment you notice the most response from.
Once you’ve spend some time on this nerve glide, revisit your initial assessment and see if there is less tightness and better range of motion. Some of you may experience a performance increase in your squats, deadlifts, or running.
You could also do this entire sequence while laying on your side to take balance and stability issues out of the equation, but we can save that for another time to discuss. Do no more than three to five reps at time and spread them throughout the day, staying precise and fresh so your nervous system and tissues have time to learn and acclimate.
Mobilize Your Nerves and Move Your Mind
Many people maintain an active stretching and mobility routine, but haven’t received the full benefits of their effort due to poor signaling between the nervous system and the affected muscles.
Let’s move forward with a greater understanding of how to safely incorporate an approach that allows you to restore good movement in the nerves and as a result improve the quality of signaling to your nervous system. All of this will result in better strength and flexibility, along with a reduction in pain and discomfort.
Nervous system graphic [CC BY 3.0], via Wikimedia Commons
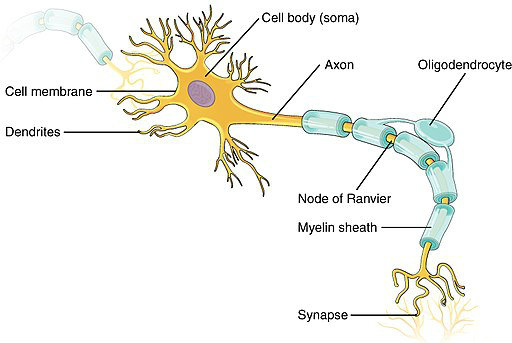
Neuron anatomy graphic [CC BY 4.0], via Wikimedia Commons


He is a highly rated kettlebell instructor, and was directly invited by Pavel Tsatsouline to serve as an assistant instructor for a closed-course kettlebell certification for the US Navy SEALs at the Dam Neck annex in Virginia Beach. He created the physical assessment and preparation course for the UN's Close Protection Officer Certification (diplomatic security) in 2009, a standard that is employed to this day.
Prior to his coaching career, Court was a third-degree black belt in Ki-Aikido, serving as a live-in apprentice to US Chief Instructor Koichi Kashiway (8th Dan) for five years, and was the 2000 gold medal winner of the international division at the International Taigi Competition in Toichigi, Japan.
He is a BFA graduate (cum laude) of the prestigious Conservatory of Theatre Arts & Film at Purchase College, SUNY. He has featured interviews in Men's Fitness, The New York Times, and USA Today. Please visit Court Wing for further details.
