This shoulder workout consists of exactly one exercise — the sitting floor arm glide. This movement strengthens the muscles of your back that hold your shoulders in an upright position, while also taking your shoulders through a full range of motion. At the same time, the exercise strengthens your lower body and levels your hips.
In a perfect world, your shoulders should be able to perform the entire arm glide movement, but due to our modern lifestyles (and the resultant bad posture) our shoulders have become stiff and immobile.
So, this shoulder workout will serve both as a functional test to let you know how much work you need to do, as well as the work itself.
The Super Simple and Shockingly Hard Shoulder Workout
Instructions:
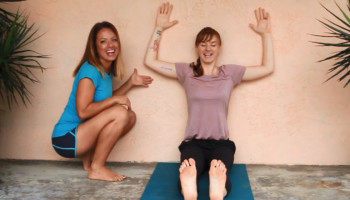
- Sit up against a wall with your tailbone snuggly wedged next to the wall and your legs straight out in front.
- Place your feet hip distance apart and make sure they are straight. (Tip: your feet are “straight” when the outside edge of your foot is straight up and down.)
- Sit up as straight as you can, with your shoulders and head touching the wall.
- Raise your arms up into a ninety-degree, goal-post position with the whole back of your arm against the wall. Make sure your elbows, wrists, backs of hands, and backs of your fingertips – both pinky and index– touch the wall at all times.
- Tighten your thighs and flex your feet back toward you.
- Slowly glide your arms up the wall, bringing your hands together to touch your fingertips. Don’t lose the ninety-degree bend at the elbows.
- Breathe deeply through your belly.
- Make sure not to let your shoulders shrug up.
- If your elbows come off the wall, limit your range of motion and only go as far as your elbows will allow.
- Start with 1 set of 5 reps and work up over time to 25 reps total.
Take your time and go slowly! We’re prioritizing form on this movement. It’s better to do a smaller range of motion than to let any part of your arms come away from the wall.
That said, if you find yourself straining or tilting your head to get it back to the wall, just allow your head to come off the wall and keep your nose pointed straight ahead.
Try this exercise after sitting hunched over at a desk, driving, or holding your children and see how you feel differently afterward. You can also do this as a warm-up to your strength training workout, especially prior to bench pressing or push-ups.

Maryann, who is currently certified as a Posture Alignment Specialist, created Realign as a way to empower others to take responsibility for their own health the same way she did. Maryann works with people one-on-one both digitally and in-person at her studio in San Diego, California.
To learn more about Maryann's programs, visit Realign Therapy. Maryann is also the founder of The Posture Workout a revolutionary online form of Posture Alignment Therapy that makes this method easily accessible for everyone.